Friday, January 24, 2014

Nailed It: A Mini Review of imPRESS Press-On Manicure

Hello, dear readers,

I am taking you back in time once again to my post on the spring Influenster VoxBox from last June. In case you're unfamiliar with Influenster, you can click here to find out more. One of the products sent to me in that VoxBox was the imPRESS Press-On Manicure from Broadway Nails. The pattern I received was called "Over the Moon."
You can see in the image above that the kit contains 24 stick-on nails in 12 different sizes, cutely packaged in a fake plastic nail polish bottle. It claims to be "fast and easy" and to last up to a week.

The first thing I noticed about these nails was the cool pattern. If you're anything like me, you love nail art but have very little patience to sit down and create said nail art yourself. I tend to only paint fancy or funky designs for special occasions [See: New Year's Eve 2011, Harry Potter opening night]. As you may imagine, I was pretty excited to have the lazy girl's version of quality nail art. The pattern here is made up of abstract deep red and gold swirls, for lack of a better word.

It's safe to say that I checked "excellent pattern" off the list. After that, I was slightly dismayed to take a closer look at the size of the nails. For reference, I have baby hands. I kid you not; I will never be a hand model with digits this diminutive and childlike. With hands like mine come short, wide nails. Naturally, I found that hardly any of the press-on nails completely covered the width of my own nails. Now this was only visible to me, because they did come close, but it was still a disappointment. The length was, quite frankly, laughable. Here is a view of my hand with the nails at their full length:
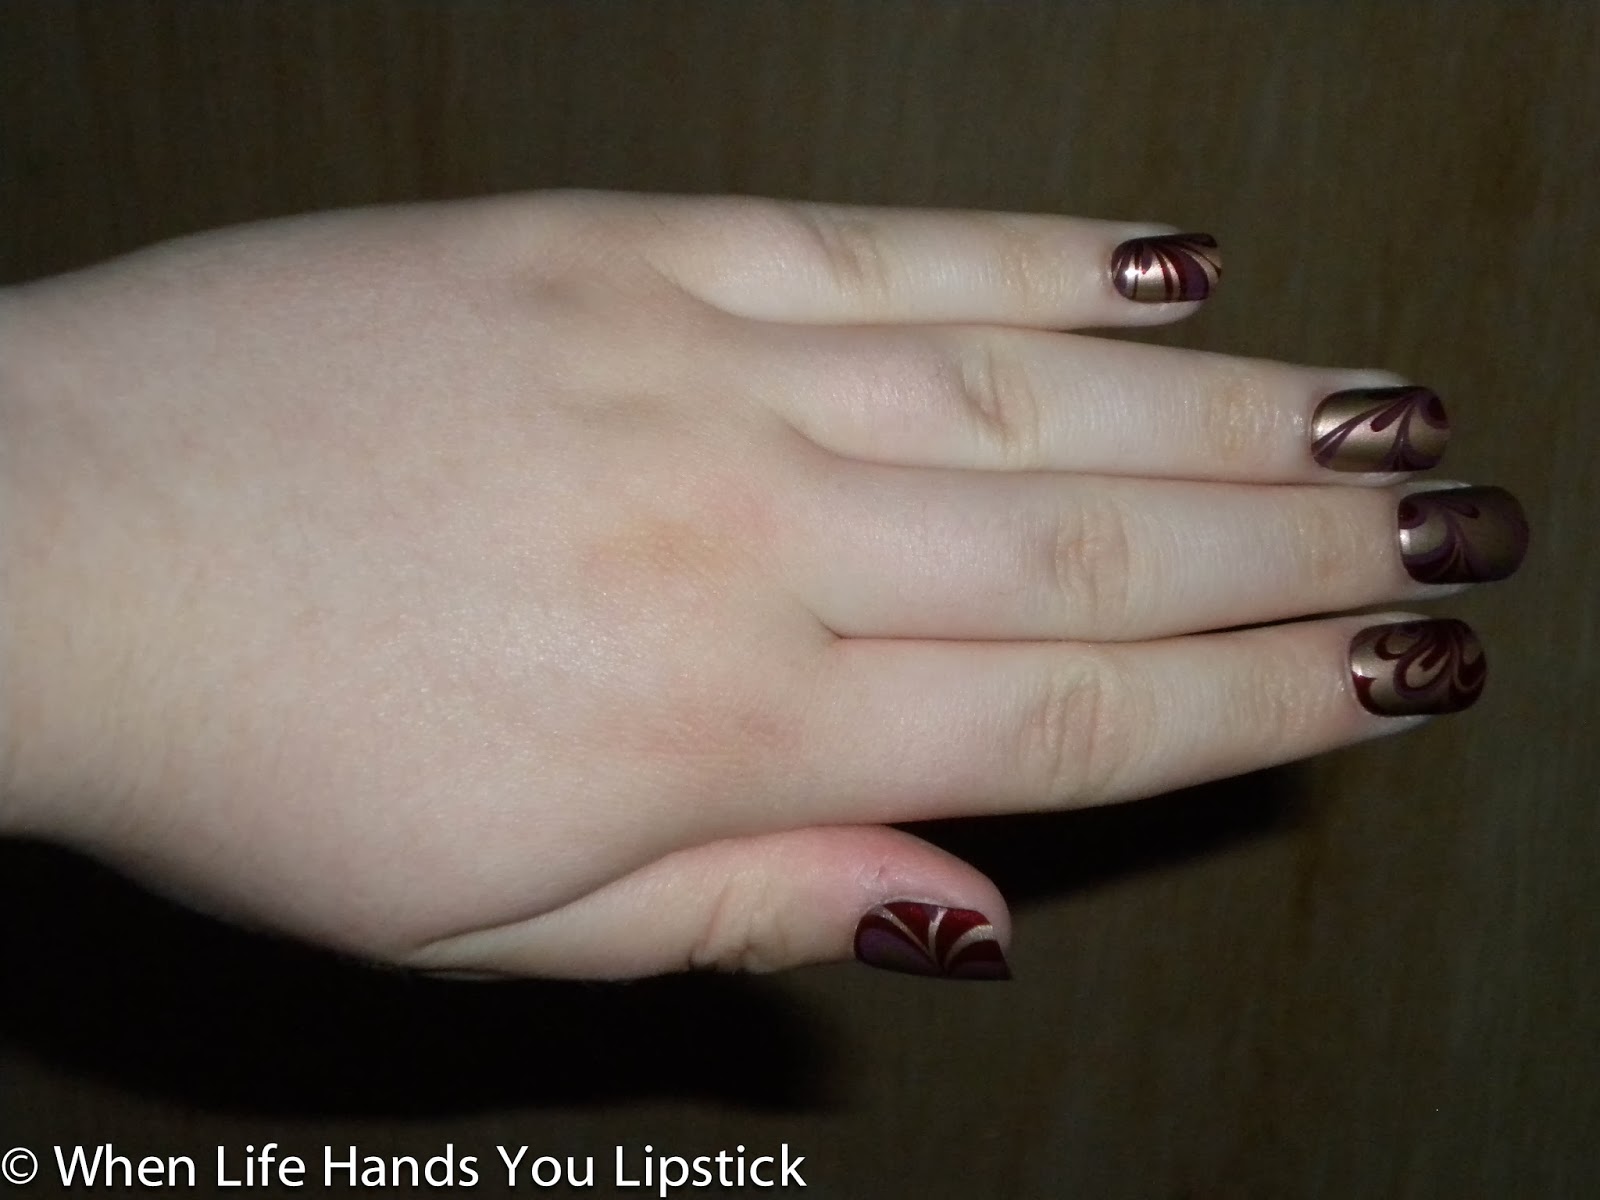
Baby hands + Talons = Not on my watch
Some people may like the look of talons, but I like to be able to use my hands. I took a pair of nail scissors to these straightaway after the initial application, hacking them down to a more appropriate size. The application itself was simple: I took the nails I wanted; laid them out in the desired order; and one at a time, I pressed the nails on.

Cutting them, however, was a pain. I had to cut into the adhesive that makes these products stick, and that left me with little balled up gluey bits between the fake nails and my real fingers. I peeled these off, but red glue kept coming through. Not enough to be noticeable to anyone else, but slightly irritating nonetheless. This is what they looked like after I cut them:
Baby hands with baby sized nails.
Much more to my taste. Aside from the sizing issues and the bits of glue reappearing throughout the 6 days I wore them, these nails didn't budge. They would have lasted one more day, but I had no patience for them anymore. The reason? They felt heavy to me, and I was eager for a change. I will say that I got several compliments on them, and my summer internship boss thought I painted them myself. Now that's what I call a success. Another bonus: No nasty chemical smell.

These nails retail from somewhere between $5 and $9 on average. I personally wouldn't purchase them, because I prefer painting my own nails. With this price point, I think it's more economical to buy a bottle of polish that will allow for numerous applications rather than the two applications this provides. I don't have the patience to painstakingly re-size all the nails either, nor do I adore the heavy feeling.

What I can say is that this product lives up to its claims. It is indeed easy to use, and it will last up to a week. There are other patterns available, and the convenience factor of pretty nail art with no effort is appealing. If you want a super simple, quick way to get professional looking nails and can't stand the smell of regular polish, I'd say checking these out would be worth your time.

As for me, I'll stick with the noxious fumes DIY approach.

How do you like to do your nails?

xEsther

Saturday, January 11, 2014

Touring My Various States of Makeup

Hello, dear readers,

Since I was absent for such an extended stretch of time, I thought it might be fun to show you a few pictures from recent months. Then I realized something fantastic: In each of the photos I selected, I was wearing a different degree of makeup. Even better, I unknowingly chose them in the following order: No makeup, everyday makeup, and makeup for going out. As a proud makeup aficionado, I will admit that I spring towards the cosmetics aisle of every drugstore and Target I enter. I swear each and every Ulta store exerts its own gravitational pull on me; it's not my fault! 

That being said, I've relearned to love makeup free days and letting my skin breathe. The people who matter most to me have seen me too many times to count without a drop of makeup, so it's nice to go out with my face au naturale. This does not, however, include lip products. I must have at least a tinted lip balm on before I leave the house. That's just how it is. 

And now, on to our tour: 
Me, Makeup Free!
This was taken at a house concert at the beginning of December, and I have to say I love the way my nails look here. I believe I was wearing OPI The Spy Who Loved Me from the Skyfall Collection. I have absolutely no face makeup on here. On my lips? Faded by that point was none other than NYC Applelicious Glossy Lip Balm in Big Apple Red. The very same product I reviewed a couple of days ago. [And no, I did not crop out the other people in the photos because I'm a raging narcissist. I simply didn't want to post anyone's picture without his or her permission, and not everyone in the photos knows I write this blog.]

Everyday Sort of Look
Obviously I don't wear makeup every single day, but this is the kind of thing I will wear when I feel like looking a little more put together to see friends or to go to class. In this particular instance, I was baking cupcakes with friends before we brought them to a quasi high school reunion in late December. On my face, I mixed my Olay moisturizer with Avon Ideal Flawless Invisible Coverage Liquid Foundation in Light Ivory. Believe it or not, the shade is significantly darker than I am; combining it with moisturizer is the only way I can wear it. A shame, really, because I quite enjoy the formula. I applied Maybelline Instant Age Rewind Dark Spot Corrector + Treatment in Fair under my eyes and to cover up any redness or spots I might have had that day. I finished off my face with Rimmel Stay Matte Powder in Transparent. On my lips, I had -- wait for it -- NYC Applelicious...You get the drift. Same lip product as before.

Maid of Honor Makeup
Finally we come to my version of full makeup. This was one of the professional photographs from my sister's wedding in October. I was the maid of honor, and I did my own makeup. I cannot take credit for the hair, though. I can never do my own hair for special occasions. I used the same concealer and powder as usual, but this time I wore them over my Urban Decay Naked Skin Foundation in 1.0, the palest of the yellow-toned foundations from that line. I went to Sephora with my mom to get my color match with the Color IQ system, and this was the product I decided on. It was my mom's treat for me, since she knew I'd be doing my makeup and would want to get it right. It's maybe a shade darker than I am, but it goes on beautifully anyway.

I wore Clinique Lash Doubling Mascara in Black, a rarity for me. Unlike most beauty junkies, I don't find mascara to be that life-changing a product. I don't have the world's darkest, longest, or fullest lashes by any means, but they show up just find on their own. I like this mascara because it's the only one I've found that doesn't get under my eyes and make me look like a raccoon by the end of the day. My lips were a bit tricky for me. I started with YBF Cosmetics lipstick in Fabuloso, a cooler toned cherry red, but I wasn't satisfied. It didn't pop, so I tissued off as much as I could. I then applied YBF Cosmetics lipstick in Love Affair, a vibrant, orange-y red that was exactly the shade I needed. If you've never heard of the brand, I wrote about YBF Cosmetics in this post here. My makeup lasted from pictures in the early afternoon until after the dancing ended around 9 p.m. It showed up nicely in the photos, if I do say so myself. You can't really see here, but China Glaze Ruby Pumps was adorning my nails.

Each photograph was taken during a joyful occasion, and each joyful occasion called for a different look. I hope you enjoyed the little snapshots of my past few months in life and in makeup.

xEsther

Thursday, January 9, 2014

Mini Review: NYC New York Color Applelicious Glossy Lip Balm

Hello, dear readers,

Remember this post about the Influenster VoxBox program, in which I promised reviews of some of the products within that handy dandy box? No? Ah, it's just as well. It's only been half a year since then. I never intended to back down on my promise, so here is the first of the reviews. This time I'll be briefly discussing the NYC New York Color Applelicious Glossy Lip Balm in the shade Big Apple Red. I'm going to do what I did in the last post and place the nifty Influenster "sticker" below, so you know that I received this product as part of the VoxBox program. Head to the website to check out what that's all about. [DISCLAIMER: To those of you who have never read my mini reviews, they are never actually mini]


Here is a look at the product itself, as it appears in the packaging:


As I was rereading my previous post, I was pleased to discover that I did not, in fact, put down too much detail about what is essentially an exceptional tinted lip balm. Like I said, I received the shade Big Apple Red and was thrilled with my luck. It's easy to get off colors or colors you're not too fond of when you're signing up to receive free products picked out by companies themselves. Just last year I won a Milani Color Statement Lipstick in the shade Nude Creme, a pinkish, beige-y nude that painted away my lips until I resembled a corpse. Absolutely nothing to complain about, because I can layer it with other colors; I got to try the new formula; and I won the lipstick for free. That's why it's especially exciting to open a box of freebies and grin at a shade you look forward to wearing, rather than grimacing and subsequently shrugging off a hue that would look great on you if only you had completely different coloring.

How long can she possibly go on about the shade of a lipstick or a balm, you ask? A very long time, it appears. Let's move along, though, shall we? The pictures here are identical to those that appeared in the last post to which I keep referring. This means that months later, I have made a significant dent in said glossy lip balm that is not reflected here. That being said, here is a better view of the product:


Big Apple Red can be described as a sheer, candy apple sort of red. The center of the balm, cutely and appropriately apple-shaped is meant to serve as the moisturizing "core" [no pun intended], but I don't know exactly how that works. Isn't the whole thing moisturizing? Why do you need to have the center be a different color just so it can be a balm? It doesn't make sense, but it is an adorable marketing ploy -- let's be honest; that's what it is. This is surprisingly pigmented for a tinted balm, especially when the center isn't red. Initially, I think the moisturizing core was to blame for a slightly streaky application, but after regular use I can say that it goes on evenly now. 

You do have to exfoliate your lips first, because, as with many colorful lip products, this will draw attention to flakes. Once that's done, however, this is such a snap to use. It really is very moisturizing; it's pigmented enough to show a pretty flush, but sheer enough to be an easy way for the color-shy to wear red lips on a daily basis; and it has a nice, glossy finish that doesn't scream, "Hey look, patent leather!". I don't ever record wear time of tinted balms, because I don't mind reapplying; it's so easy to do, that it's not important to me.

Those who care about the presentation of their products might be turned off by the cheap looking packaging and cheesy, somewhat juvenile marketing of the balm, but I don't mind it at all. This Applelicious Glossy Lip Balm twists down all the way, so there is no danger of ruining the product with the cap when closing it. I can honestly say this is one of the products I reach for on a regular basis, whether I'm casually hanging out with friends on a lazy weekend or going to the grocery store. It is, as I said before, incredibly easy to wear. It feels great and leaves my lips smooth even after it wears off. I feel like my face is brightened up by the color, even when I'm not wearing other makeup. I wore this quite a bit over my winter break [which started December 19 and ends this weekend]. It adorned my lips during a casual high school reunion at a friend's house; a trip to the mall with my mom; and several visits with friends. I wore it yesterday, and I'm wearing it today.

I would post a picture of the product in all its dented glory now, but that requires finding my camera, uploading and editing, most of which I am unable to do at the present moment without the camera cord. The photo I took with PhotoBooth simply won't do. I think you can guess that I rather enjoy this product. If I ever finish it up and can justify a replacement among my copious amounts of lip products, I will more than likely repurchase.

You can look for it here on the NYC website, where it lists the retail price as $2.99.

I hope your new year is starting off wonderfully well.

xEsther